In this article, I discuss how I used an open-source application delivery platform called Lagoon to store and deliver IoT sensor data.
Introduction Link to heading
About a year ago, I was completing a computer organisation course at my local university. For a short while this had me hyperfixated on embedded devices and the software associated with it. Despite being orthogonal to my usual engineering work, it was this article by Dries Buytaert (the creator of Drupal) that introduced me to what would be my first IoT project.
In short, Dries built a simple temperature monitoring system based around the Adafruit Sensirion SHT4x sensor. Dries’ solution made use of an ESP32 microcontroller to read from the sensor and send it via WiFi to his Drupal website, which had an API endpoint exposed for the purpose. At that point in time, I already owned everyone’s first single-board computer, the Raspberry Pi (model 4B, to be precise). Rather than purchase an additional component, I figured I could use that instead.
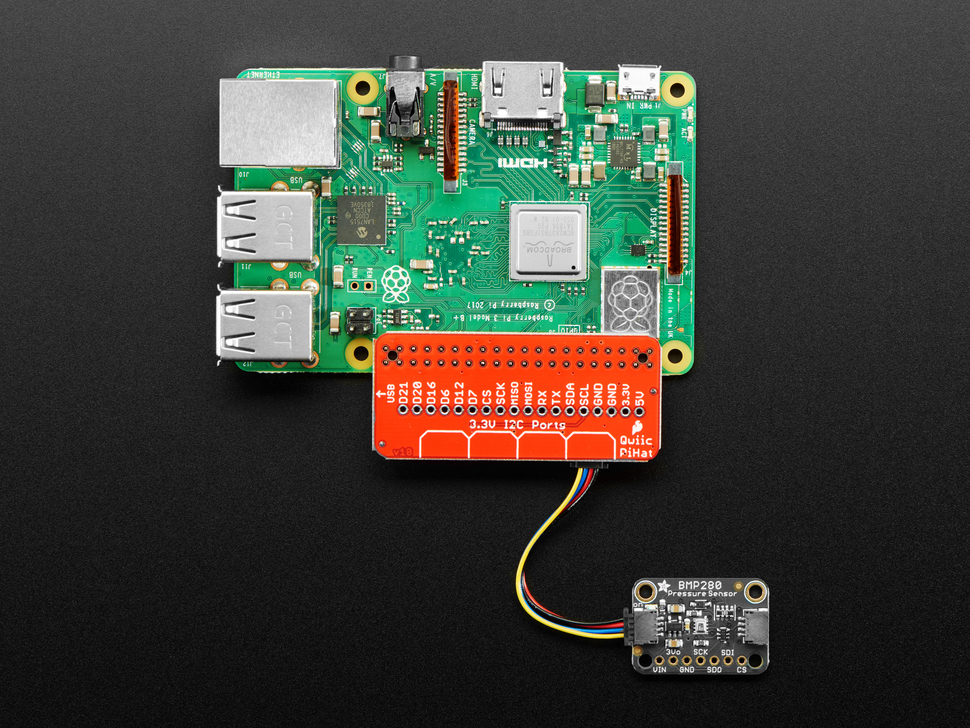
The sensor itself spoke I2C, a common serial communication protocol, and Adafruit exposed this via a Qwiic connector. While the Raspberry Pi 4B does not support Qwiic out of the box, it does provide a flexible 40-pin GPIO header. Using a Qwiic HAT (“Hardware Attached on Top”), we can then connect the sensor to the Pi via a JST 4-pin cable. It looks pretty much exactly like this:
In his article, Dries publishes the sensor data to his Drupal website, so I was inspired to do the same. This opened a Pandora’a Box, as I didn’t yet have a website, nor had I figured out where such a website would be hosted. This article explains the solution I ended up taking.
In short, it looked something like this:
- A reading is taken from the sensor, via a small binary making use of available drivers.
- Then, the reading is POSTed to a small HTTP server hosted in Lagoon that stores the data in memory
- Finally, the server can be polled via GET requests to obtain the latest data, for example by this website.
Reading the data Link to heading
When I was first investigating this project, I was doing a lot of systems programming in C for one of my university courses. This was fortunate, as anyone with embedded experience knows that most drivers are written in C, and the Sensirion SHT4x is no exception. Sensirion maintains an excellent driver called raspberry-pi-i2c-sht4x that fitted my use case perfectly. With this in hand, I came up with what I felt was the simplest possible design to get sensor readings up to the internet: a binary that takes a single reading from the sensor, constructs a basic JSON payload, and posts it to a specified endpoint. This binary could then be run at regular intervals, for example via a cron schedule.
To get started, I first defined a basic interface that covered my needs:
#include <inttypes.h>

typedef struct {
    uint32_t serial_number;
    float temp;
    float humidity;
} Reading;

void takeReading(Reading *);
void printReading(Reading *);
char* readingToJSON(Reading *);
Then, following Sensirion’s example program closely, I created a function to read from the sensor:
void takeReading(Reading* reading) {
    int16_t error = NO_ERROR;
    uint32_t serial_number = 0;
    float a_temperature = 0.0;
    float a_humidity = 0.0;

    sensirion_i2c_hal_init();
    sht4x_init(SHT40_I2C_ADDR_44);
    sht4x_soft_reset();
    sensirion_i2c_hal_sleep_usec(10000);

    error = sht4x_serial_number(&serial_number);
    if (error != NO_ERROR) {
        printf("error executing serial_number(): %i\n", error);
        return;
    }
    reading->serial_number = serial_number;

    sensirion_i2c_hal_sleep_usec(20000);
    error = sht4x_measure_lowest_precision(&a_temperature, &a_humidity);
    if (error != NO_ERROR) {
        printf("error executing measure_lowest_precision(): %i\n", error);
    }
    reading->temp = a_temperature;
    reading->humidity = a_humidity;
}
On reflection, the sleeps are probably not necessary, but the example program used them and it seemed to work, so I didn’t think too hard about it at the time.
Next, I had to marshal this data into JSON format.
Considering the simplicity, I should have just constructed the JSON manually - e.g via a Sprintf() call.
Younger me however, decided that a JSON library was called for!
Unlike modern languages, C does not have a defacto module or packaging system, but I did find this “ultralightweight JSON parser in ANSI C” called cJSON.
The cool thing about this library is that it is contained entirely within one C and one header file, meaning that linking and compiling it in my makefile was dead simple.
An overengineered marshalling function followed:
char* readingToJSON(Reading* reading) {
    char* json_string;
    cJSON* temp;
    cJSON* humidity;

    cJSON* reading_json = cJSON_CreateObject();

    temp = cJSON_CreateNumber(reading->temp);
    humidity = cJSON_CreateNumber(reading->humidity);

    cJSON_AddItemToObject(reading_json, "temp", temp);
    cJSON_AddItemToObject(reading_json, "humidity", humidity);

    json_string = cJSON_PrintUnformatted(reading_json);

    cJSON_Delete(reading_json);

    return json_string;
};
The rest of the C program simply opens a TCP connection with the specified host, writes the HTTP POST request, and then reads the response. Fairly standard stuff as far as C systems programming goes, so I will omit it. If you are interested, you can find it here. I used a fairly basic makefile to link and compile the program, resulting in a binary runnable like
./sensor example.com 80 /api/v1/update
Of course, I wanted to take regular readings from the sensor. Since I aleady had a linux binary, cron was the natural way to achieve this. Providing an update each minute seemed reasonable, so I simply edited the cron schedule with
crontab -e
and appended
* * * * * /path/to/binary sensor-reading-service.example.com 80 /api/v1/update
You can find the whole program here.
Storing the data Link to heading
Now that I had a way to post the sensor data to any location on the internet, I needed somewhere to send it! In most cases, this is where a database would come in. While any database would work given the simplicity of the data, I only cared at this point about seeing the current data. Further, I wanted to display this information on my personal website, for which I knew I wanted to use a static site generator. Therefore, a database and even a redis cache would be totally overkill. Instead, I decided to store it directly in memory using a microservice.
Any service that met my requirements would need to satisfy three criteria:
- Be able to store two floats
- Expose an HTTP endpoint to update these floats
- Expose an HTTP endpoint to check the value of these floats
A lot of my recent work has been in Go, so I decided that given the tiny scope of my requirements, I could satisfy them with a simple custom HTTP server written in Go.
Naturally I could have asked ChatGPT to do it for me and most likely would have had a working solution in less than 5 seconds - but I wanted to learn. Instead, I sought out a decent article. Now to be honest, I couldn’t really find any exceptional ones (i.e ones that covered advanced topics like thread pools) but I did find this basic one from Bartlomiej Mika that could get me started.
Following the article closely, I created a main.go with
func main() {
	c := controllers.NewBaseHandler()

	router := http.NewServeMux()
	router.HandleFunc("/", c.HandleRequests)

	s := &http.Server{
		Addr: ":3000",
		Handler: router,
	}

	fmt.Println("Starting server...")
	if err := s.ListenAndServe(); err != nil && err != http.ErrServerClosed {
		panic(err)
	}
}
Then, I defined my sensor data structure with a mutex lock to prevent concurrency issues:
type SensorData struct {
	Temp float64 `json:"temp"`
	Humidity float64 `json:"humidity"`
}

var (
	data SensorData
	lock sync.Mutex
)
Next, I defined the API endpoints I wanted to expose:
type BaseHandler struct {

}

func NewBaseHandler() (*BaseHandler) {
	return &BaseHandler{}
}

func (h *BaseHandler) HandleRequests(w http.ResponseWriter, req *http.Request) {
	if req.URL.Path == "/api/v1/status" && req.Method == http.MethodGet {
		h.getStatus(w, req)
		return
	}

	if req.URL.Path == "/api/v1/update" && req.Method == http.MethodPost {
		h.update(w, req)
		return
	}

	http.NotFound(w, req)
	return
}
The BaseHandler fluff is leftover from the article which did use it, but I decided to keep it anyway (yes, I’m aware that violates YAGNI - sue me).
The getStatus and update methods were not complex either:
func (h *BaseHandler) update(w http.ResponseWriter, r *http.Request) {
	var newData SensorData

	if err := json.NewDecoder(r.Body).Decode(&newData); err != nil {
		http.Error(w, "Invalid JSON", http.StatusBadRequest)
		return
	}

	lock.Lock()
	data = newData
	lock.Unlock()

	w.WriteHeader(http.StatusOK)
}

func (h *BaseHandler) getStatus(w http.ResponseWriter, r *http.Request) {
	lock.Lock()
	defer lock.Unlock()

	w.Header().Set("Content-Type", "application/json")
	json.NewEncoder(w).Encode(data)
}
And this is all you need (Kind of - there is one more tweak needed, but I’ll discuss it soon). Now that we have a service to store the data, how and where is it going to be deployed? This is where Lagoon comes in.
Hosting the data Link to heading
Lagoon is an open-source application delivery platform built by Amazee.
Essentially, it is a layer on top of kubernetes that allows you to deploy any containerised application without having to deal with kubernetes-related concerns, such as Helm charts.
You can think of it as your own personal Netlify or Vercel, except you can deploy pretty much anything that you can fit into a docker-compose.yml file.
To deploy an existing compose setup to Lagoon, you have to create a .lagoon.yml file and then make some minor tweaks to your compose file - this process is refered to as lagoonisation.
This means I had to do two things:
- First, set up Lagoon on a cluster running on a machine I own.
- Then, lagoonise all the applications I wanted to host.
Now, these are substantial topics in their own right, so I intend to publish some further articles that explore them in depth. An intrepid reader can find this information for themselves in the Lagoon documentation, which is fairly extensive. For now however, lets assume we have a Lagoon instance available and have lagoonised the temp-handler microservice, as I called it. You can see how I did that here.
All you have to do now is add a new project inside your organisation in the Lagoon UI dashboard. There is also helpful documentation on how to do this here. Once it has been deployed, a route is created automatically for you, and the dashboard looks something like this:
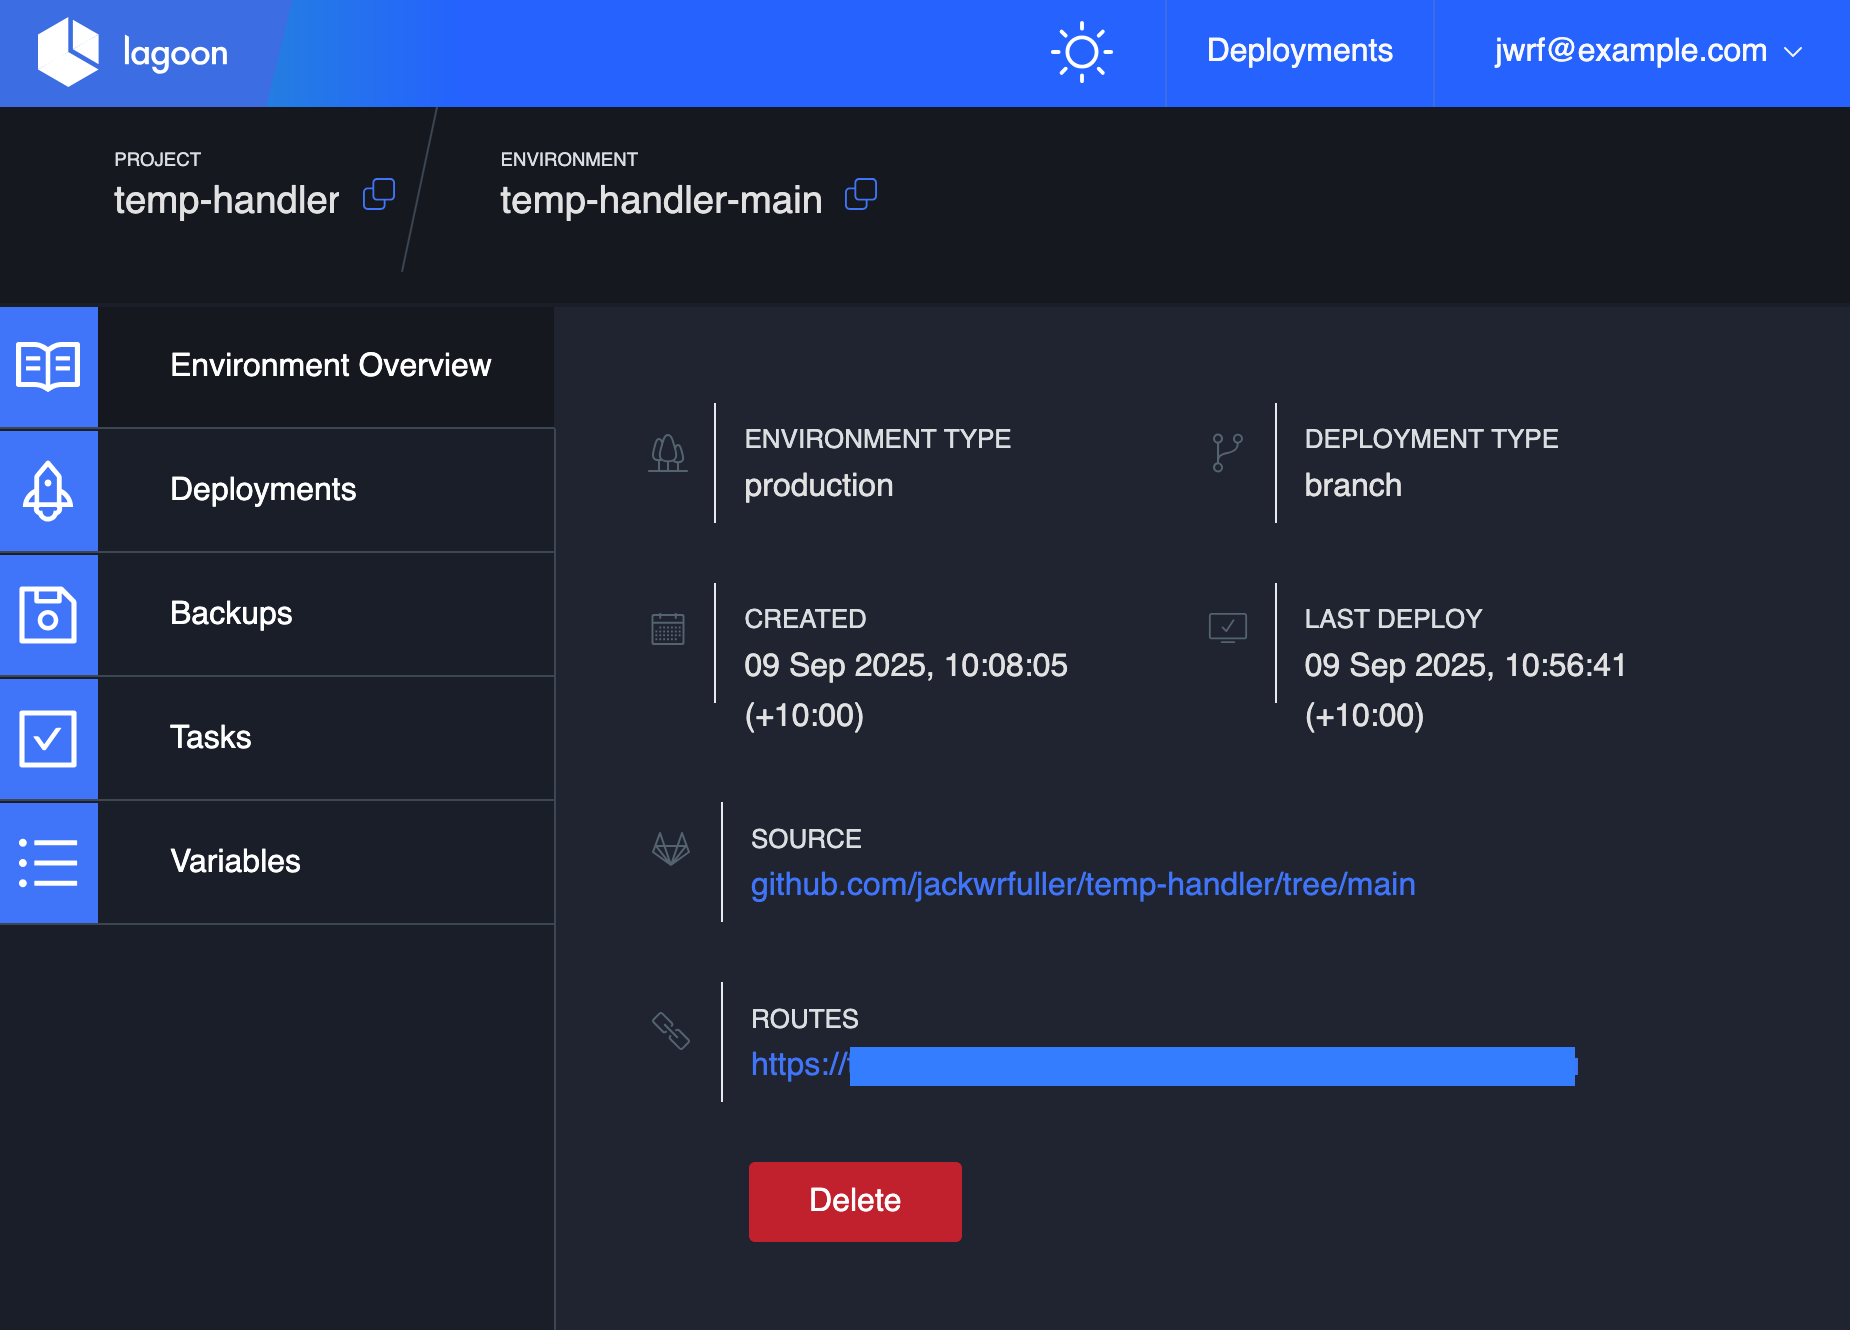
The microservice is now up and running!
Using the data Link to heading
In my case, I simply wanted my personal website to display the current temperature and humidity. This website is built with the popular static site generator Hugo, and in particular I am using the Hugo Coder theme.
To accomplish what I intended, I first wrote a small javascript snippet to fetch the data:
document.addEventListener("DOMContentLoaded", function() {
    fetch("sensor.example.org/api/v1/status")
        .then(res => res.json())
        .then(data => {
            const tempElem = document.getElementById("temperature");
            const humElem = document.getElementById("humidity");

            if (tempElem) tempElem.textContent = `Temperature: ${data.temp.toFixed(2)} °C`;
            if (humElem) humElem.textContent = `Humidity: ${data.humidity.toFixed(2)} %`;
        })
        .catch(err => console.error("Failed to fetch sensor data", err));
});
In the spirit of keeping things simple, I decided to display the information just in the website footer.
In Hugo, you can override your theme’s HTML templates by having one with the same name.
In my case, I copied my themes footer.html to layouts/_partials/footer.html and appended the following:
{{ if .Site.Params.footer }}
<footer class="footer">
  <section class="container">

    ...

    <div class="sensor-values">
      <span id="temperature">Temperature: -- °C</span> ·
      <span id="humidity">Humidity: -- %</span>
    </div>
  </section>
</footer>

{{ $sensorJS := resources.Get "js/temp-handler.js" | minify | fingerprint }}
<script src="{{ $sensorJS.RelPermalink }}"></script>
{{ end }}
At this point, I thought I was done.
Wrong!
You see, there is a thing called Cross-Origin Resource Sharing (CORS), and because my custom Go HTTP server was not setting the relevant CORS headers, my browser was rejecting the attempt to fetch and run the javascript. Fortunately, only a minor modification was required fix things up.
In main.go of temp-handler, I needed to add some middleware to inject the right headers (yes, I’m aware this is not secure):
func corsMiddleware(next http.Handler) http.Handler {
    return http.HandlerFunc(func(w http.ResponseWriter, r *http.Request) {
        w.Header().Set("Access-Control-Allow-Origin", "*")
        w.Header().Set("Access-Control-Allow-Methods", "GET, POST, OPTIONS")
        w.Header().Set("Access-Control-Allow-Headers", "Content-Type")
        if r.Method == "OPTIONS" {
            w.WriteHeader(http.StatusOK)
            return
        }
        next.ServeHTTP(w, r)
    })
}
Then the HTTP server needed to use this function as the handler, i.e:
	s := &http.Server{
		Addr: ":3000",
		Handler: corsMiddleware(router),
	}
And that was all! You can see the results at the bottom of this page.
Conclusion Link to heading
Once you have it set up and understand how to lagoonise applications, Lagoon is a phenomenal tool. While it has traditionally been used to deploy applications that are hard to make cloud-native (such as Drupal), Lagoon essentially lets you build your own hosting platform. In this case, it is even in a rough sense somewhat emulating the AWS Lambda functionality - and for a self-hosting aficionado like myself, that’s a dream come true.